How to bring your widgets from TYPO3 Flow to Neos
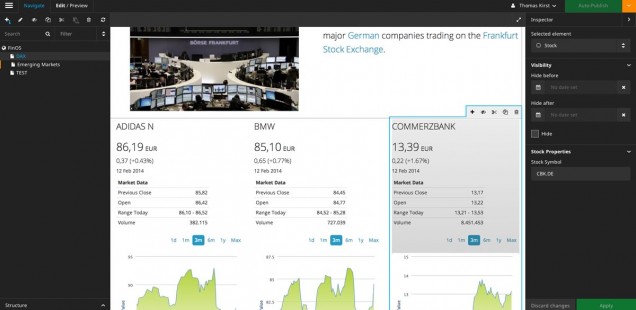
I have been developing a TYPO3 Flow application for some time now. The app uses widgets for displaying financial data, e.g. stock prices and currency rates.
I was curious about how to move my existing package to Neos and of course I wanted to reuse my widgets. Furthermore I wanted to give the editor the opportunity to specify stock codes or currency pairs which will be used by the widget.
I came up with two approaches:
- Using a plugin within Neos
- Creating a new content element type
I will start to describe the latter variant, as it seemed to be easier to implement – and it really was quite simple!
Kickstart your site
The first thing you want to do is to kickstart a new site package within your Neos installation. You can either do this within the CMS or on the command line:
|
1 |
./flow kickstart:site <package key> <site name> |
Create a new content element
Configuration of a NodeType in yaml
In order to create a new NodeType you need to configure it in your file Configuration/NodeTypes.yaml.
|
1 2 3 4 5 6 7 8 9 10 11 12 13 14 15 16 17 18 19 |
'MG.FinOS:Stock': superTypes: - 'TYPO3.Neos:Content' ui: label: Stock icon: icon-bar-chart inspector: groups: stock: label: Stock Properties properties: stockSymbol: type: string defaultValue: '' ui: label: 'Stock Symbol' reloadIfChanged: true inspector: group: stock |
Creating the template
The next step will be to create the HTML template for your widget.
/Packages/Sites/MG.FinOS/Resources/Private/Templates/NodeTypes/Stock.html
|
1 2 3 4 5 6 7 8 9 10 11 12 |
{namespace neos=TYPO3\Neos\ViewHelpers} {namespace mg=MG\App\ViewHelpers} <div> <f:if condition="{stockSymbol}"> <f:then> <mg:widget.stock stockSymbol="{stockSymbol}" /> </f:then> <f:else> <p>Please specify stock symbol</p> </f:else> </f:if> </div> |
My widget’s view helper name is mg:widget.stock. Therefore I added the namespace to the top.
Include the widget view helper
I just use my existing view helper here:
/Packages/Application/MG.App/Classes/MG/App/ViewHelpers/Widget/StockViewHelper.php
|
1 2 3 4 5 6 7 8 9 10 11 12 13 14 15 16 17 18 19 20 21 22 23 24 25 26 27 28 |
<?php namespace MG\App\ViewHelpers\Widget; use TYPO3\Flow\Annotations as Flow; class StockViewHelper extends \TYPO3\Fluid\Core\Widget\AbstractWidgetViewHelper { /** * @Flow\Inject * @var MG\App\ViewHelpers\Widget\Controller\StockController */ protected $controller; /** * AJAXify the widget * @var boolean */ protected $ajaxWidget = TRUE; /** * @param string $stockSymbol The stock symbol * @return string */ public function render($stockSymbol) { return $this->initiateSubRequest(); } } ?> |
The functionality will then be implemented in my StockController. Note the annotation in the widget view helper where it says to which controller the request is being delegated ($controller).
The logic is in the StockController where the stock object is being fetched from the repository and afterwards it will be assigned to the template.
/Packages/Application/MG.App/Classes/MG/App/ViewHelpers/Widget/Controller/StockController.php
|
1 2 3 4 5 6 7 8 |
class StockController extends \TYPO3\Fluid\Core\Widget\AbstractWidgetController { public function indexAction() { $stockSymbol = $this->widgetConfiguration['stockSymbol']; $stock = $this->stockRepository->findOneBySymbol($stockSymbol); // ... $this->view->assign('stock', $stock); } |
Adding another content element
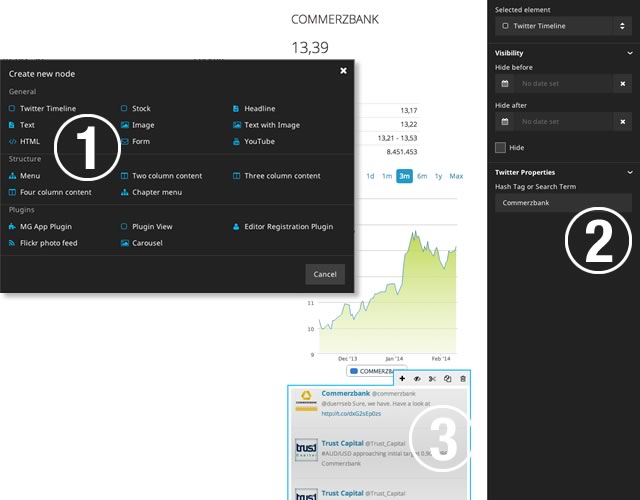
It has been already fun to bring the first widget to life in Neos. I took another one, which is a Twitter widget. The procedure is exactly the same:
- The editor can create a new node of the type Twitter Timeline
- He is then able to edit a hashtag or a search term
- The widget will show the configured timeline from Twitter
Just to recap the necessary steps:
1. Define the content element (yaml)
|
1 2 3 4 5 6 7 8 9 10 11 12 13 14 15 16 17 18 |
'MG.FinOS:TwitterTimeline': superTypes: - 'TYPO3.Neos:Content' ui: label: 'Twitter Timeline' inspector: groups: twitterTimeline: label: 'Twitter Properties' properties: searchTerm: type: string defaultValue: '' ui: label: 'Hash Tag or Search Term' reloadIfChanged: true inspector: group: twitterTimeline |
2. Create a template for the content element and include the widget:
|
1 2 3 4 5 6 7 8 9 10 11 12 |
{namespace neos=TYPO3\Neos\ViewHelpers} {namespace mg=MG\App\ViewHelpers} <div> <f:if condition="{searchTerm}"> <f:then> <mg:widget.twitterTimeline searchTerm="{searchTerm}" /> </f:then> <f:else> <p>Please specify a search term</p> </f:else> </f:if> </div> |
Note: The property ‘searchTerm’ as edited in Neos will go directly into the template. No further adjustments are necessary!
The Plugin Way
The first attempt to integrate my widgets into TYPO3 Neos was to create a plugin. You can read about the basic steps here: Creating a TYPO3 Neos plugin.
The only thing worth mentioning is where I asked myself ‘how do I get the property values into my template’?
As of now you will be able to access the values, which have been entered in the Neos backend by following these steps:
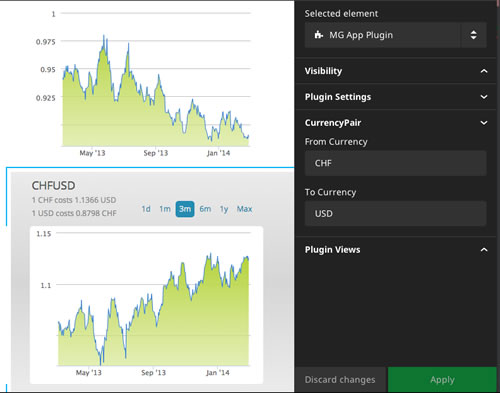
- Specify your plugin through Configuration.yaml:
12345678910'MG.App:Plugin':superTypes: ['TYPO3.Neos:Plugin']ui:label: 'MG App Plugin'group: 'plugins'inspector:groups:currencyPair:label: CurrencyPair... - Add some TypoScript to tell Neos the default controller and action for your plugin. I have put my TypoScript configuration into my package’s Resources/Private/TypoScripts/Library/Plugin.ts2.
123456prototype(MG.App:Plugin) < prototype(TYPO3.Neos:Plugin)prototype(MG.App:Plugin) {package = 'MG.App'controller = 'Currency'action = 'show'}
This way I can now refer to it from my site’s Root.ts2:
1include: resource://MG.App/Private/TypoScripts/Library/Plugin.ts2 - As we are going to call the ‘show’ action we need a template ‘Show.html’ which holds our widget view helper:
123{namespace mg=MG\App\ViewHelpers}<mg:widget.currency fromCurrency="{fromCurrency}" toCurrency="{toCurrency}" /> - The important part here is to pass the values to the currency widget through the controller. That being said, we need to adjust the showAction() of the CurrencyController where we retrieve the values and pass them on:
123456public function showAction() {$fromCurrency = $this->request->getInternalArgument('__fromCurrency');$toCurrency = $this->request->getInternalArgument('__toCurrency');$this->view->assign('fromCurrency', $fromCurrency);$this->view->assign('toCurrency', $toCurrency);} - We are now done and our widget will hopefully show up!
It pays off when you use widgets within your Flow app or your Neos website. It’s easy to reuse your loosely coupled widgets in whichever context you like.
This is a really great tutorial, thanks for posting it!
[…] How to bring your widgets from TYPO3 Flow to Neos (Thomas Kirst) […]
Great tutorial, thanks! But i don’t get the point where you actually generate the html code?
In the controller you only assign some variables, and in the template you are only triggering them with .
And why is it Ajax? Isn’t it rendered by templating?