
From Prompt to Picture
Building an Automated AI Image Generation Pipeline
New Image Generation Model “FLUX1.Dev”
I came across a new image generation model named “FLUX”.
It has been developed by Black Forest Labs. They were amongst the founders of Stable Diffusion.
The FLUX model is not only capable of creating stunning images, they look sometimes even better and more realistic than the ones from Midjourney or DALL-E.
But there are two more key benefits:
- The model is “open source”, which means you can even run it locally on your machine!
- It understands to write text in the images properly which was quite a difficulty to get it right up to now.
Let’s just have a look at this image where I wanted the words “TALK TO YOUR MONEY” and the logo “moneygarden” be written on it:

Right on point!
The problem with image generations
When you start trying out generating the images, it can become cumbersome, writing and adjusting the prompts.
- Sometimes you lose your prompt when the web page reloads.
- Or, you visit the page at another time and your prompt is lost.
- You also might forget about the image settings that you used when you got a great result.
Therefore I wanted to save my prompts somewhere in a database.
The generated images should also live next to the prompts that I used.
In addition, I wanted to keep the image settings.
So I asked myself: how can i safely store my prompts, settings and images in one place without having to program a more or less complex web app to achieve this?
In this post, we’ll explore how to automate image generation using AI models, specifically the new FLUX1.Dev model. We’ll create a workflow that combines database management, workflow automation, and API integration to streamline the process of generating and storing AI-created images.
Automating the image generation process
In order to achieve this goal of having all information in one place and automate the process of the image generation, I decided to use three tools:
- NocoDB for the database. It is similar to Airtable where you can easily set up your desired table structure.
- n8n as a workflow processing engine. It allows me to take the prompt and image settings, calling an API to generate the image, and write the generated image back to the database.
- Replicate, a platform which hosts the image model and offers an API to which I can send my data. It will take care of the image processing and returns the generated image.
Prerequisites: Before we begin, ensure you have:
- A NocoDB account (cloud or self-hosted) for database management
- Access to n8n (cloud or self-hosted) for workflow automation
- A Replicate account with API access
- Basic familiarity with JSON and API concepts
Table structure in NocoDB
First, I set up the table structure in your NocoDB (create a “base” first):
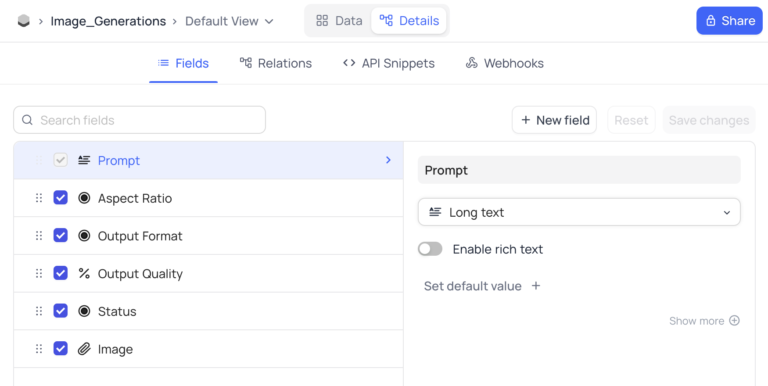
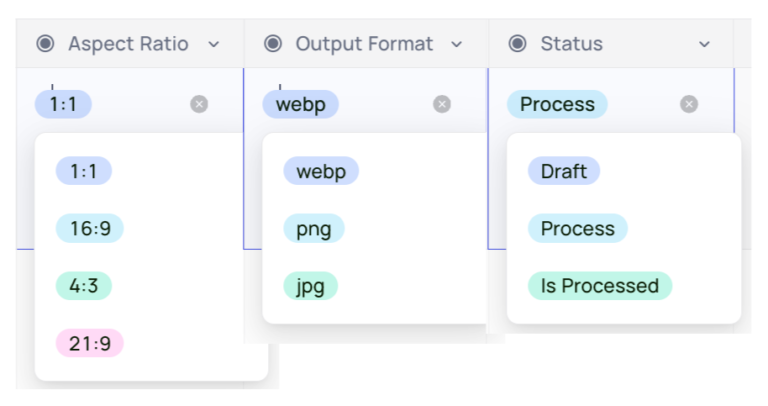
The options for the single selects are these:
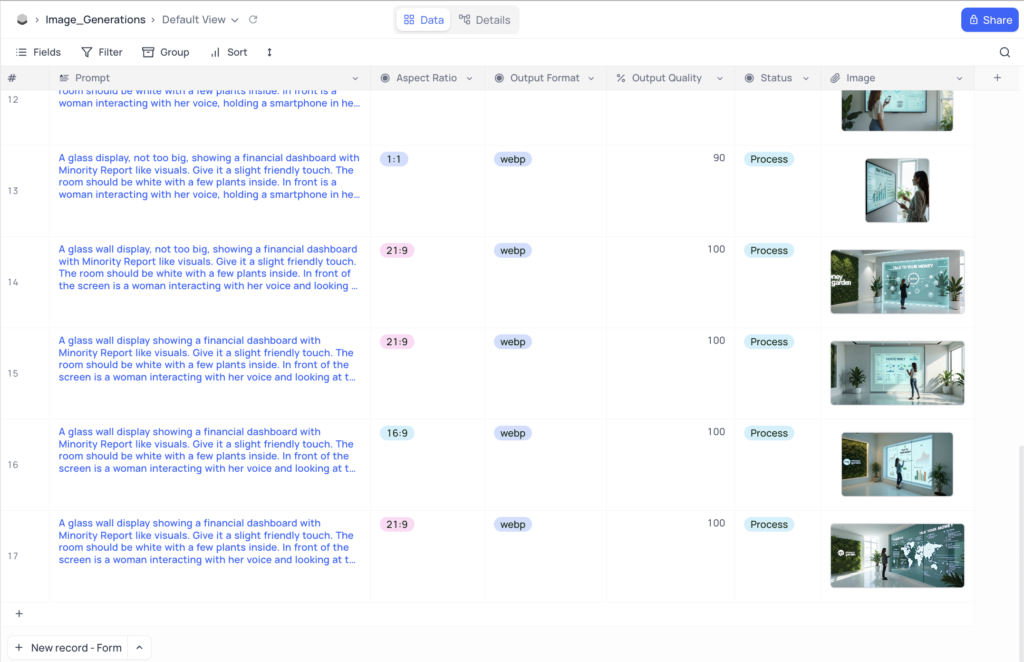
We will then have the opportunity to either create new image prompts in the table’s grid view or in a form:

The status field is quite important. When we set it later to “Process”, a webhook will be triggered (“After Update”) which starts the image generation. A webhook is simply a URL which will start the process in n8n.
We will come to that in a minute.
We can already start entering our prompts for the images which we want to generate.
The end result will look like this:
Now, how does the webhook trigger work?
Set up the webhook trigger for n8n
Whenever a new line is added to the table, we enter the prompt, set an aspect ratio for the image, and set the output format and quality.
When the status field is changed to “Process” we want the image generation process to start.
To achieve this, we need to set up the webhook:
![]()
We select the tab “Details”, give the webhook a name and configure the following:
- As an Event we select “After Update”
- We will have to enter a URL which we can get from n8n. Leave it blank for now.
- As the HTTP Action we select “POST” instead of “GET”.
- We add a condition which states “when the status field has changed to ‘Process’, this webhook must be called.”
NocoDB will then call our n8n webhook with all our data present so far.
Let’s move on to the workflow automation part.
Design the image generation workflow in n8n
You can use n8n´s cloud version to design the workflow or even self-host the software – it´s open source and therefore free! I will write another article about how to set up n8n on your own small private server (which will cost you only a few bucks per month).
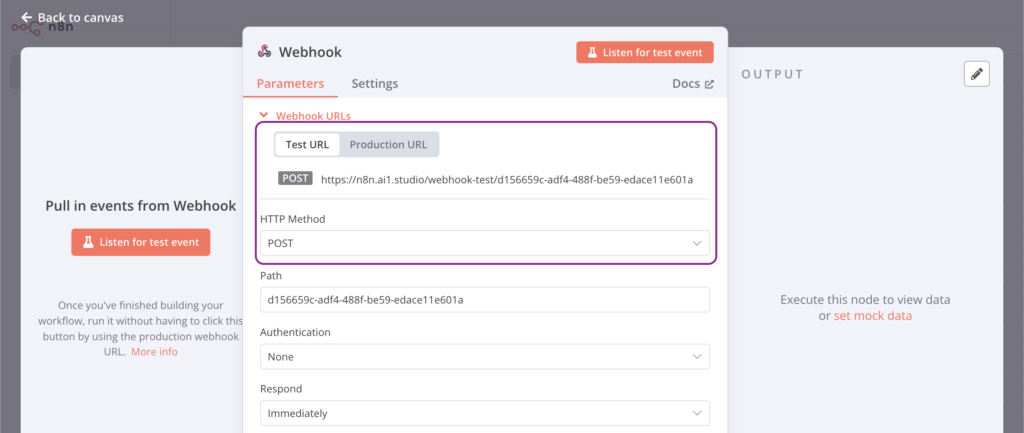
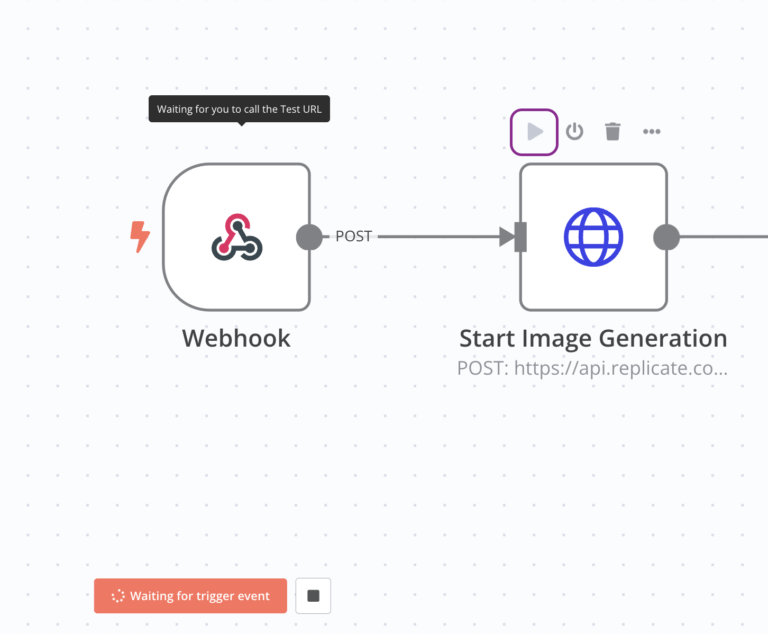
I open the n8n dashboard and start designing with a webhook trigger:
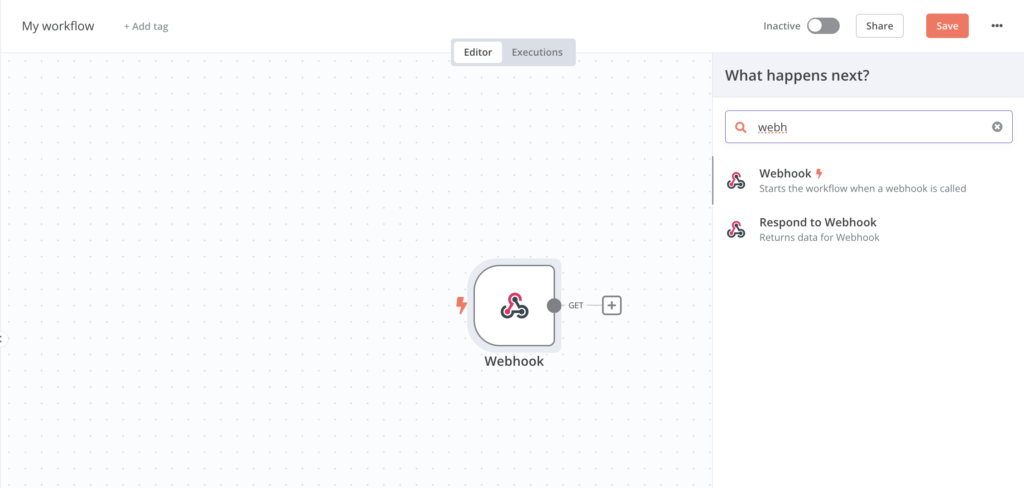
When you click on the Webhook node, you will see the webhook URL that we need to paste into NocoDB´s form.
It´s important to note that you also change the setting there from “GET” to “POST”.
As a next step we need to perform the actual call against the Replicate API.
HTTP Request node with URL for the Replicate API
An HTTP Request node will help us with this task.
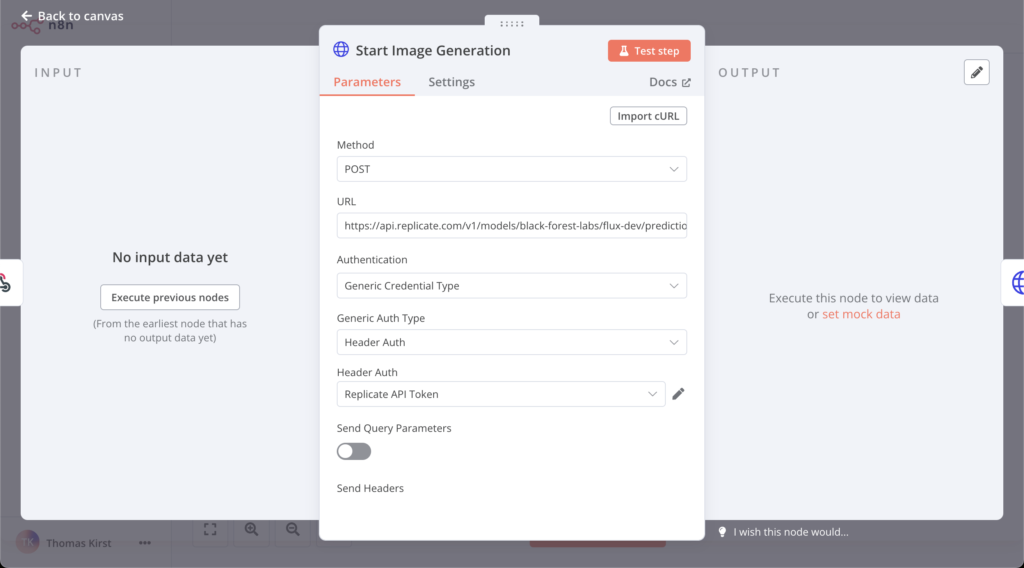
- We need to enter the URL for the image generation API, which is: https://api.replicate.com/v1/models/black-forest-labs/flux-dev/predictions
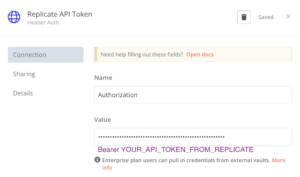
- We will need credentials from Replicate to authorize ourselves. Get an API key from Replicate and create “Generic Credential Type” –> “Header Auth” element. It has the name “Authorization” and the value “Bearer YOUR_API_KEY_FROM_REPLICATE”.
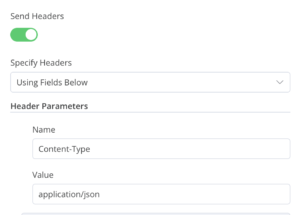
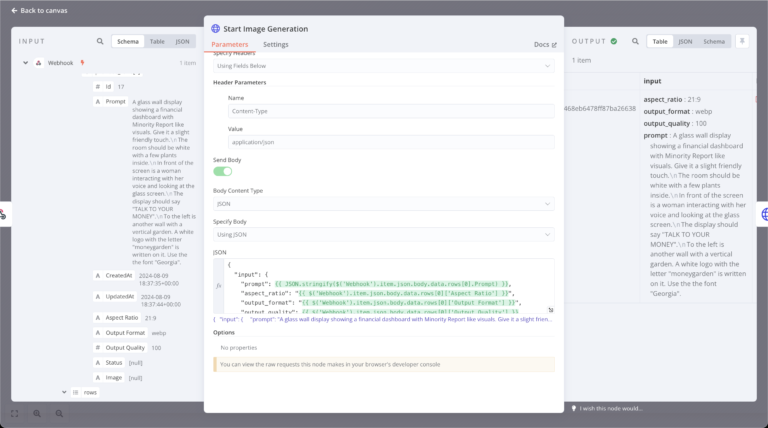
- Activate the “Send Headers” option and “Content-Type” with the value “application/json”. This means we are going to send our data to Replicate in the all-famous JSON format.
- Now comes the tricky part: we need to define a JSON object that maps our fields from the database to the JSON format as it is expected from Replicate:
12345678{"input": {"prompt": {{ JSON.stringify($('Webhook').item.json.body.data.rows[0].Prompt) }},"aspect_ratio": "{{ $('Webhook').item.json.body.data.rows[0]['Aspect Ratio'] }}","output_format": "{{ $('Webhook').item.json.body.data.rows[0]['Output Format'] }}","output_quality": {{ $('Webhook').item.json.body.data.rows[0]['Output Quality'] }}}}
Header Auth with Bearer Token
Setting the Header Content-Type for application/json
Configuring the JSON body content with the prompt and image settings
Let it flow
Once we wired up all necessary fields we can try a test run.
Don´t forget to copy the webhook URL to your NocoDB table!
Click on the play button of your HTTP Request node, which you can also rename, as I did.
The webhook is now in listening mode.
Let’s move over to NocoDB and enter a prompt, along with some image settings.
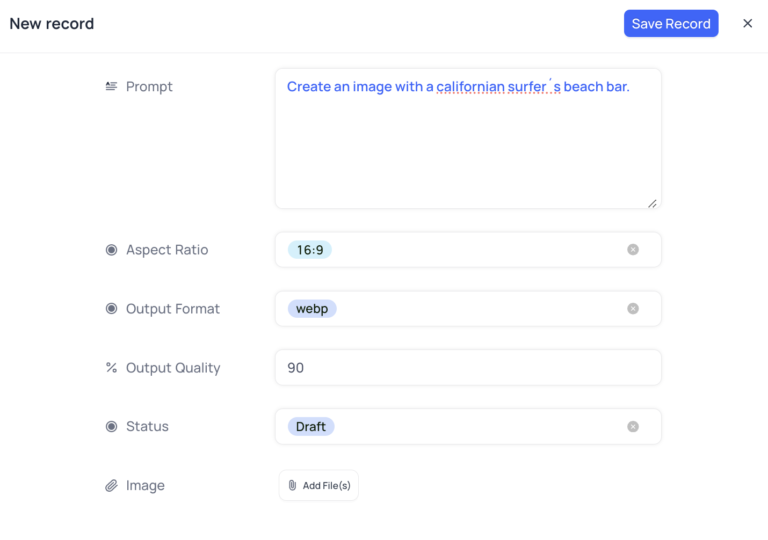
Remember, the moment you select the “Process” status and save the entry, the webhook will be triggered. We leave it here as “Draft”, and once saved, we change the status to “Process” in the table view, since it only triggers “After Update” and not “After Insert”.
We change the status to “Process” now and on the n8n side we should see a response from the call that has been made against the Replicate API.

Unfortunately, we will not receive the image straight away. We will be given a URL which we need to regularly check (e.g. call) until the image is generated for us.
This requires some form of loop. But don´t worry, we don´t have to program anything. We just wire up a few nodes which will do the “polling” and check, if the image has been generated yet.
Implementing the Polling Loop
Now that we’ve initiated the image generation process, we need to set up a polling mechanism to check if the image is ready. This is where the power of n8n’s workflow design comes into play.
This is how the polling process will look when all nodes are in place:
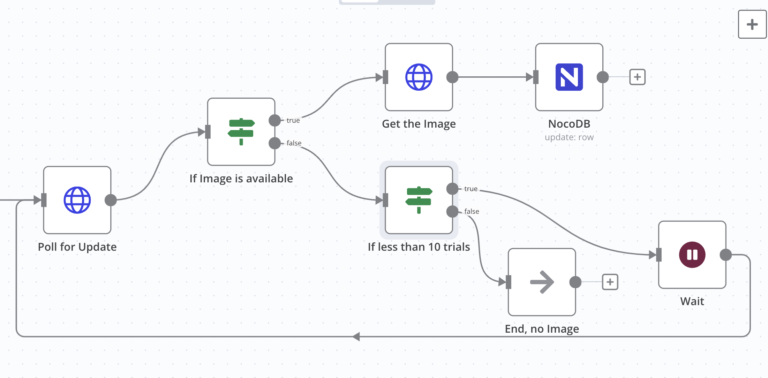
Let’s break down the process step by step:
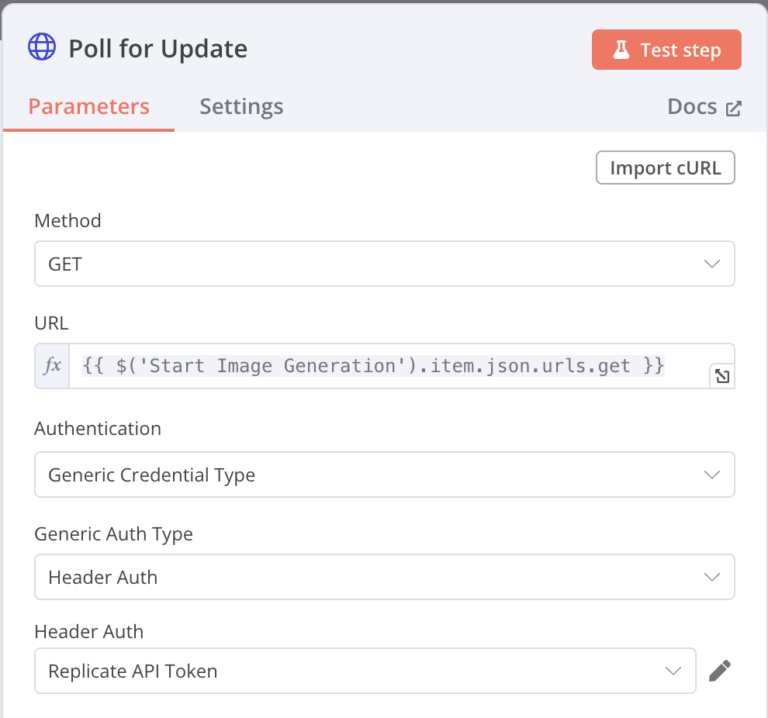
- Poll for Update Node
First, we’ll set up a “Poll for Update” HTTP Request node. This node will periodically check the status of our image generation.- Set the Method to GET
- In the URL field, use the expression:
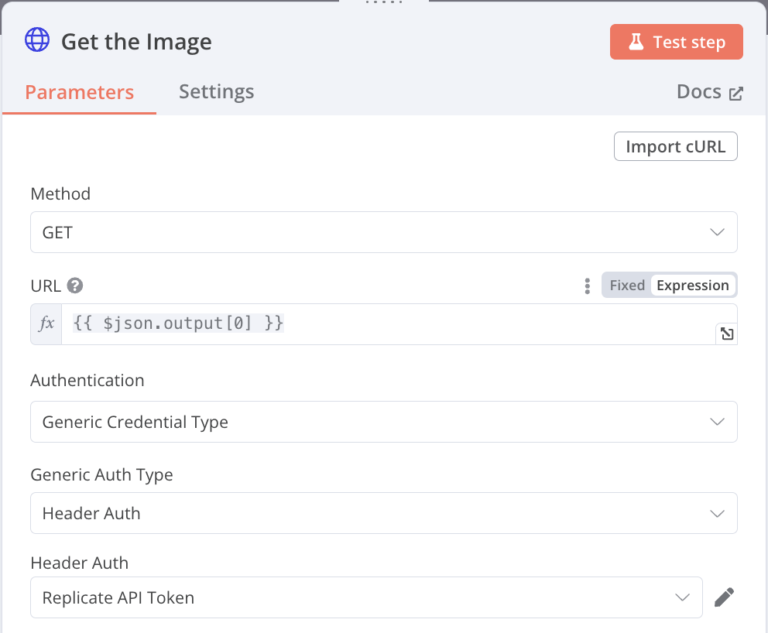
{{ $('Start Image Generation').item.json.urls.get }} - Set the Authentication to “Generic Credential Type” and “Header Auth” (with the Replicate API token which we created before)
- Use your Replicate API Token for authentication
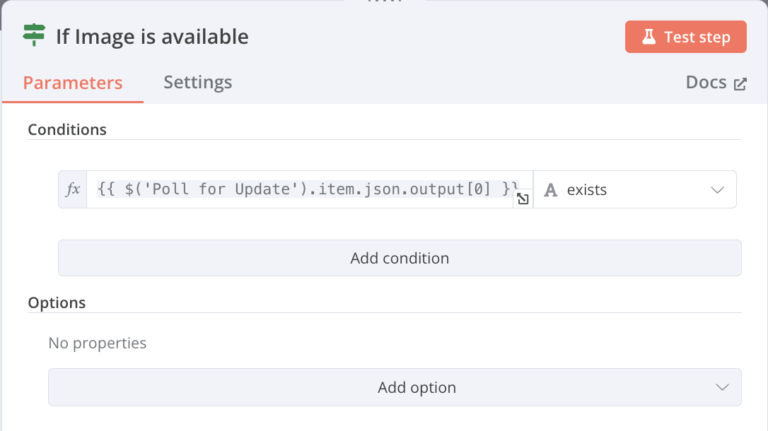
- If Image is Available Node
Next, we’ll add an “If” node to check if the image is ready.- Set the condition to:
{{ $('Poll for Update').item.json.output[0] }} exists - This checks if the API response contains an output, indicating the image is ready
- Set the condition to:
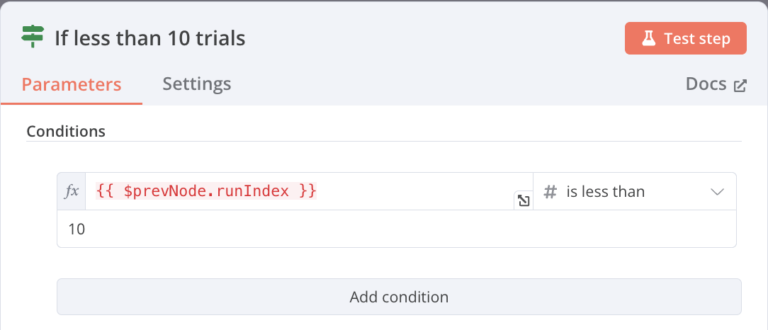
- If Less Than 10 Trials Node
To prevent infinite loops, we’ll add another “If” node to limit the number of polling attempts.- Set the condition to:
{{ $prevNode.runIndex }} is less than 10 - This ensures we don’t poll more than 10 times
- Set the condition to:
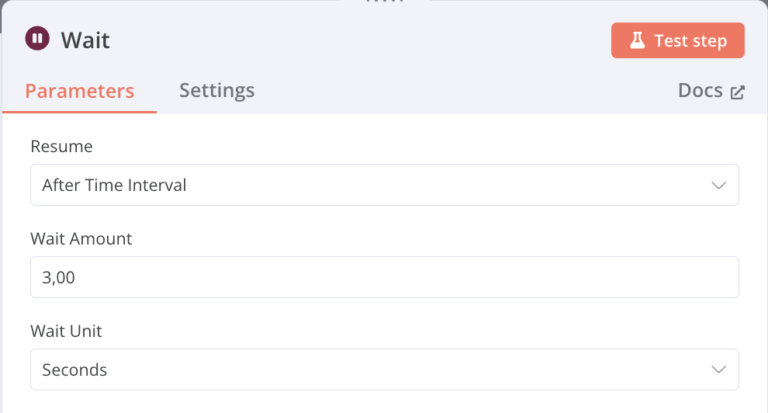
- Wait Node
If the image isn’t ready and we haven’t reached 10 attempts, we’ll wait before trying again.- Set “Resume” to “After Time Interval”
- Set “Wait Amount” to 3.00
- Set “Wait Unit” to Seconds
- Get the Image Node
Once the image is available, we’ll fetch it using another HTTP Request node.- Set the Method to GET
- In the URL field, use the expression:
{{ $json.output[0] }} - Use the same authentication as the “Poll for Update” node
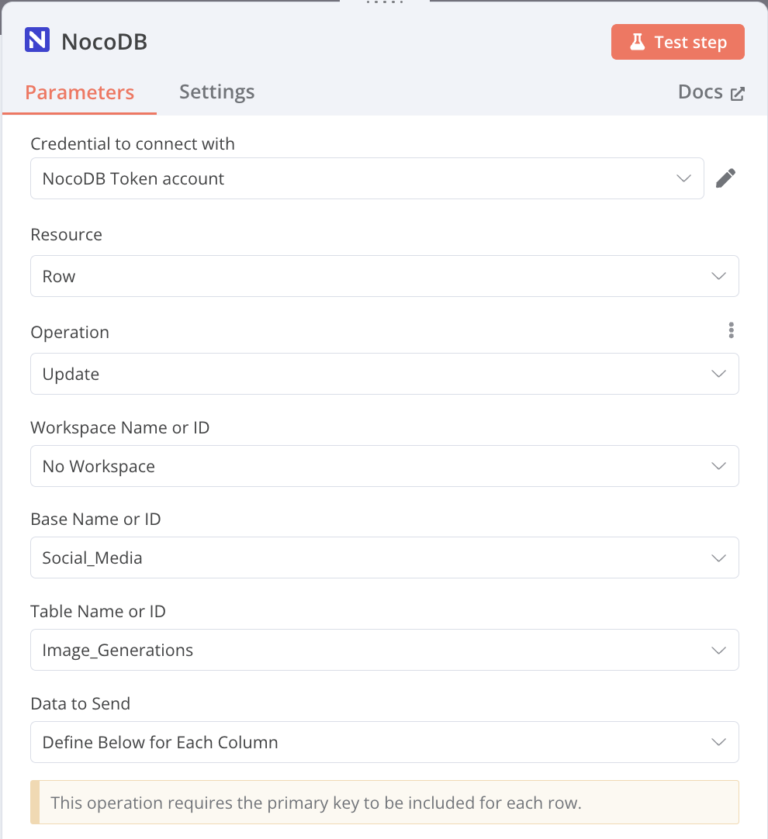
- NocoDB Update Node
Finally, we’ll update our NocoDB table with the generated image.- Set the Resource to “Row” and Operation to “Update”
- Choose your Base and Table
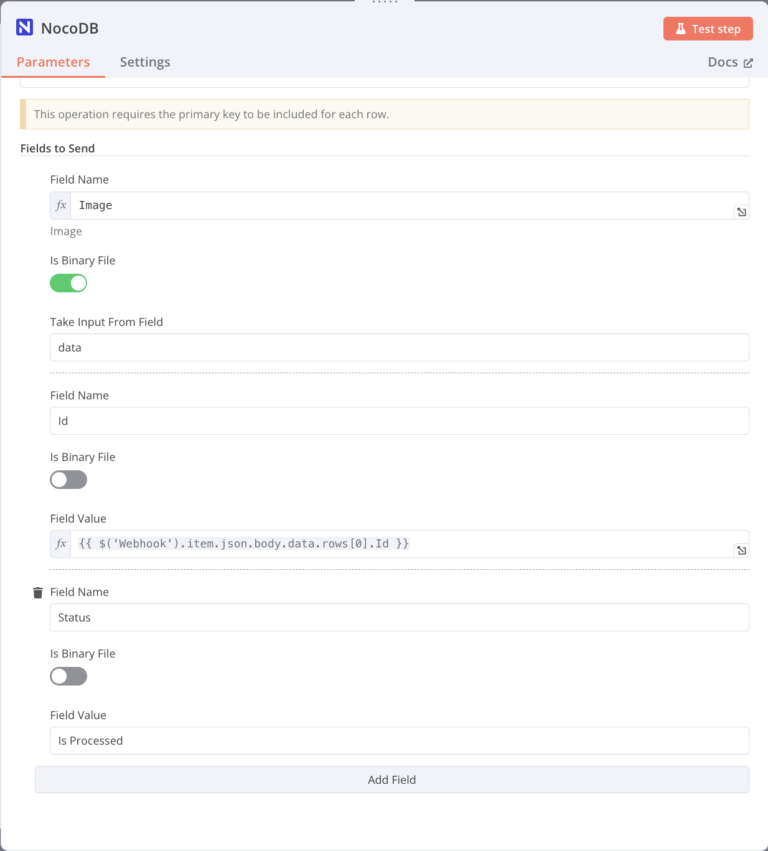
- In the “Fields to Send” section:
- Set a field named “Image” with “Is Binary File” enabled
- Set “Take Input From Field” to “data”
- Add another field named “Id” (this is the Id of the updated row which we receive from NocoDB)
- Set its value to
{{ $('Webhook').item.json.body.data.rows[0].Id }} - Set “Status” to “Is Processed”
Connecting the Nodes
Now that we’ve set up all our nodes, let’s connect them to create our workflow:
- Connect the “Poll for Update” node to the “If Image is Available” node
- From “If Image is Available”:
- Connect the “true” output to the “Get the Image” node
- Connect the “false” output to the “If Less Than 10 Trials” node
- From “If Less Than 10 Trials”:
- Connect the “true” output to the “Wait” node
- Connect the “false” output to an “End” node (to stop polling if we’ve reached 10 attempts)
- Connect the “Wait” node back to the “Poll for Update” node to create the polling loop
- Connect the “Get the Image” node to the “NocoDB” update node
With this setup, your workflow will continuously check for the generated image, fetch it when it’s ready, and update your NocoDB table with the result.
Testing the Workflow
To test your workflow:
- Ensure all nodes are properly configured and connected
- Run your workflow by triggering the webhook (e.g., by changing the status in your NocoDB table)
- Monitor the execution in n8n’s workflow editor
- Check your NocoDB table to see the updated image once the process completes

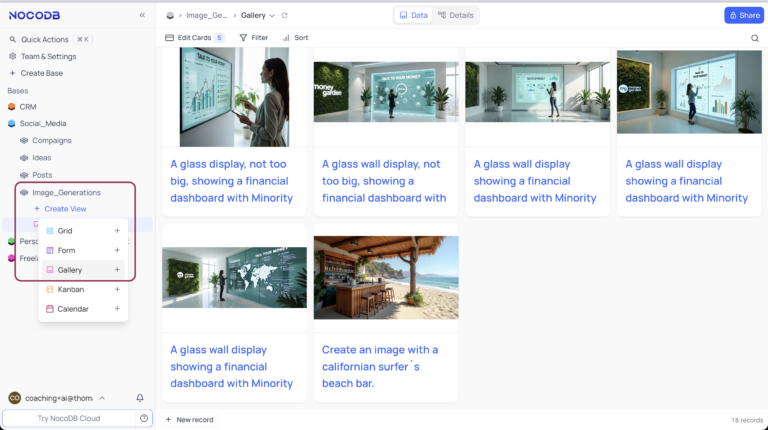
Gallery View
We can also create a gallery view of our generated images!
Performance, Cost and Security
- Performance and Costs:
This setup can handle multiple image generations per hour. Be aware of API usage costs from Replicate, which vary based on image size and quantity. n8n and NocoDB offer free tiers suitable for personal use, with paid plans for higher volumes. - Security Considerations:
Always keep your API keys secure. Never share them publicly or commit them to version control.
Conclusion
By combining NocoDB, n8n, and the FLUX1.Dev API, we’ve created a powerful, automated image generation workflow.
It handles the asynchronous nature of the Replicate API and manages potential delays.
This setup not only streamlines the creative process but also provides a structured way to manage and store your AI-generated artwork. 🎉